Friday, June 28, 2013

A Trio of Cards

For the first time ever I played in the Viva La Verve Sketch Challenge. It is a month long challenge with a new sketch each week and you have till the end of the month to do all four.
Well, I didn't realize that today was the due date for all four. I still had three left to do. I still can't believe that I made three cards in a few short hours plus I finished the laundry, cleaned all three bath rooms and got the trash and recycle out to the curb. I feel like I accomplished quite a bit today.
OK, now for my first card:
 
 Here is the sketch for Week 2:
This was a very unusual sketch for me so I left this sketch for the last card. But it actually came to gather rather easily. I was very surprised but thankful since time was not on my side today. I ran the blue cardstock that I used for the background through my Cuttlebug with a swirly embossing folder then I  cut an oval in half from the floral pattern paper.
 Finding a stamp for this card was actually the most time consuming part. I just couldn't figure out what I wanted to use. Finally I went with a Verve stamp which I stamped with VersaMark WaterMark ink on white cardstock then embossed with white embossing powder. I then inked the white cardstock with Wild Honey Distress Ink & Rusty Hinges. I adhered it down over the oval halves, adhered the green strip and the yellow ribbon over the green strip. I knew I didn't want use the square shape so I used an orange button threaded it with baker's twine and tied it in a bow on the backside of the button.
Up next is the 3rd:
 This is the sketch for week 3
And I used the Colour Q Challenge #195 for color inspiration.
I don't use purple very much in my cards although I love the color. I think it is because I just don't have much purple in my pattern papers. So I made my own with a flower stamp set from Papertrey Ink and used all the colors in the ColourQ Challenge. After I was done with the random stamping I embossed it with the Swiss Dot embossing folder and inked the edges with Dusty Concord Distress ink.
I made the three banners with the deep purple and light gray cardstock and stamped the sentiment with the dusty concord ink.
 Here is the last card and sketch:
I went with classic black and white I have admired so many other cards that are white on white or black and white so I thought it was time I made my own. I also  wanted to use the black and white teacup ribbon  because I have had it for a while and haven't had the opportunity to use it till now.
Here is sketch #4:

The dies and and stamps are from Papertrey Ink. I Used black soot distress  ink for the teapot and VersaMark WaterMark ink for the sentiment then used white embossing powder. After adding the teapot die and the sentiment I thought the background die needed something to make it pop so I added the white pen stitching around it.
I didn't want to add the two little banners in the corner so I used a white button and threaded it with black and white baker's twine instead.
I think this one is my favorite and I also really like the first one. Which one is your favorite?
If you want to see Week 1 card and sketch here it is.
Happy Friday!

Teresa


Thursday, June 27, 2013

Tuesday Trigger + A Verve Sketch

Happy Thursday morning to you all!
The card I have to share with you today was inspired by this weeks beautiful Tuesday Trigger over at the Moxie Fab World and the Viva La Verve Sketch week 1.
Here is the card I whipped up last night merging these two challenges together:
Here is the Viva La Verve sketch...
 ...and the beautiful Tuesday Trigger.
 Tangerine Scene
I am just in love with those soft colors. When I was looking for colors to match up with the Trigger I kept I kept coming up with blue mixed in with the colors I wanted. Then I noticed that If you look closely  at the Trigger you will see just a smidgen of blue rickrack.
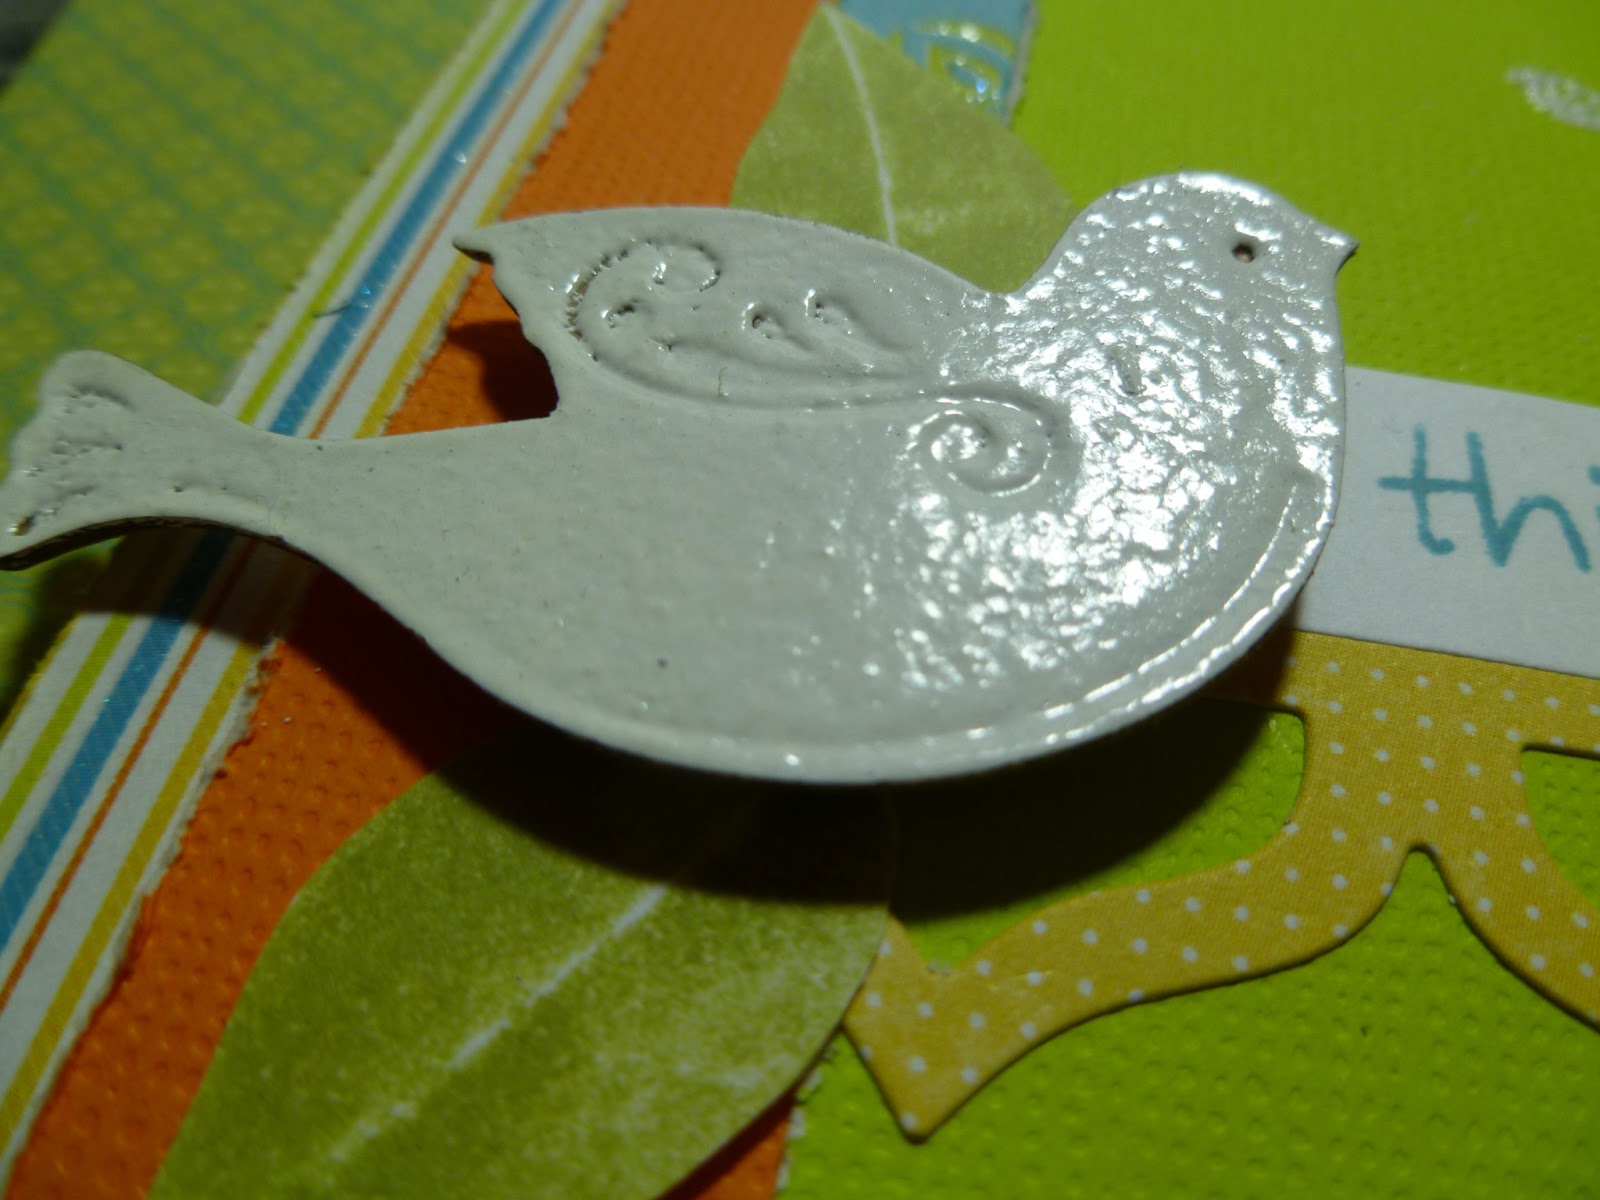
Not only was I inspired by the colors from the Trigger but also by the chipboard that the rickrack is wrapped around. I remembered some cute embossed chipboard that I had and pulled out a bird shaped piece. 
Now I had tried to use this bird before and messed it up but didn't throw it away, it was just too cute. Now I am glad I didn't. I just flipped it over and embossed it using Versamark Watermark ink and white embossing powder. I love it when I try a new technique and it works! I also love that you can still see the detail of the dry embossing on the bird. I wish I could remember who's blog I found this technique on. Sorry :(
After adding all the design elements to the card and the bird I thought the card still looked bare so I added the tree to the top banner stamping it a bit off to the side and embossed it with white embossing powder.
I found the yellow pattern paper border scrap and used it along with the sentiment which I stamped with Broken China distress ink.
 
Thinking that I was done and ready to clean up  my desk something was still nagging at me. It still needed something.
So I stamped a couple of leaves in Shabby Shutter, cut them out and added them around the bird. Aah, much better.
 So this morning when I took the photo to post it here on my blog I still had this nagging feeling that it still looked a little on the bare side. Now I am a CAS kind of gal but I still felt something was missing. 
So out came the pearls and a bit of Shabby Shutters ink around the edges of the card and that did the trick.
 I now was satisfied with the card and I could finally take my photos. The card really did come together really quick. Just had to make a few minor adjustments.
 Here is how I finished off the inside by using the tree stamp again and using bits of paper I had to trim off for the front of the card. I stamped the tree, which by the way is from Hero Arts, in Shabby Shutters Distress ink.
I really am in love with the colors...so soft and pretty.
I will be linking this to Tuesday Trigger and Viva La Verve Sketch Challenge June Week 1
So why don't you head on over and join the fun!
Thanks so much for the visit and have a great Thursday!

Teresa


Tuesday, June 25, 2013

Mixed Media Journal

OK, here is what I said I was working on in my last post:
 I was inspired by this post by Patter at Triple the Scraps. You really need to take a look at her journal. It is awesome! I am not using mine so much as a journal. It is more of a list of supplies like my distress inks so when i am out shopping I can look at it and know if I already have that color or not. I also have my Spellbinders, distress Markers and stains, Stickles and much more in my list journal.
This is what the journal looked like before I had fun with it.
I dug out my distress stains and used Broken China all over the front back and inside pocket on the back then went around all the edges with Vintage Photo distress stain then misted heavily with water so the colors could blend. Once I figured out where I wanted my stamping to go I then ran Picket Fence distress ink over that area. I stamped the ledger stamp from Purple Onion Designs in Tuxedo Black Memento ink over where I had swiped the Picket Fence stain. I found a Tim Holtz stamp that I thought was fitting and stamped that over the ledger stamp with the same ink. I also had a Studio G stamp, Create! that I stamped at the top and the scissors I stamped around the sentiment.
  I had fun using things from my stash that I have had for a long time and just never found a layout or card to use it on. That is why I used the sparkly leaves. I think I should have used something else after the fact but there they are.
 I have had this pretty little crochet flower in my stash for a while and I needed something in the bottom right corner to add some more weight than the little chipboard corner piece I had.
On the other hand I am really happy how the label turned out. I had the Caution: Artist at Work stamp and I was just going to stamp it right on the background then put the chipboard frame (which I covered with Wild Honey distress stain) over it. Then I thought of using this little black and kraft label. It is hard to see but I lightly spritzed the label with Bahama Blue mist from Tattered Angels before stamping on it. I layered the chipboard frame  and added the brads.
 And the other element that I was really happy about is the chipboard flourish. I covered it with Tim Holtz Tissue tape then sprayed it with the Bahama Blue mist. I then inked the edges with Vintage Photo distress ink. I use the inking tool on the parts I could then finished it by taking the foam piece off the inking tool and just using my hands so I could get into the tight places. Oh, yes I covered the flourish and the front cover with Mode Podge so it is really shiny.
 This is the inside pocket on the. back of the journal. Is just stamped a border stamp in black at the bottom then the library card above which is from Papertrey Ink and added some words to it which are also from a Papertrey Ink set of stamps. I haven't covered it with mod podge yet because I may add some more stamping at the top yet
 This is just another angle of the front cover so you can see the dimension maybe a little better.
The little wood bird was the last detail to be added. He was just the right size to fit. I inked him with Wild Honey and the branch is inked with Vintage Photo. I spritzed it with a bit of water and I really liked how the water blended the ink.
This is the back. It is just covered with Broken China and Vintage Photo ink stain then misted with water. I think I am going to leave it plain. I don't want journal too thick and bulky since I carry it in my purse. I will cover it with Mode Podge though.
There you have it! I know the journal isn't a work of art, but it is so freeing just to create something where you can try new techniques or just throw whatever you want together. If you haven"t done this yet you should give it a whirl.So fun!
Have a great day!

Teresa

Monday, June 24, 2013

Summer Finds

I don't have anything creative to share today although I really want to show you what I was working on today. It isn't finished so it will have to wait for another day.
I do have a couple of photos that I took when I was out this afternoon sweeping the deck, porch and patio after all the wind we had last night left quite a mess.
My hanging baskets don't get enough  sun hanging under the eaves of the porch so I move them down to the deck or on the patio table so they can get more sunshine and the geraniums can get enough sun to bloom. Well today I noticed this little nest in one of the hanging baskets:
The tiny nest has one lonely soft, brown speckled egg laying in the center. I noticed the inside was white and upon closer inspection I saw it was the long hair from our dog. Unfortunately I doubt the little bird will come back now that it's home has been moved.  I didn't see mama bird the whole time I was outside. At least our nest of robins out front are doing well and getting big. I think there is at least two baby robins in the nest and now they are stretching their wings. I'm sure it won't be long before we see them trying out there wings. I will miss watching them when they leave their nest. 
I also noticed my herbs and pepper plant are growing by leaps and bounds. 
This is how they looked when I first potted them.
There was lots of room for them to grown. Now it is full.
There are even little baby peppers forming. The only concern I have is it said they were orange peppers. So far they are green but according to my husband all peppers start out green and change color as they mature. I don't know about that but we will find out soon enough.
I thought I would also share some of my summer blooms that I took last week while working out in the gardens and just never got around to sharing. These are Foxglove which grow in the wild here but look pretty in gardens.
 These pink pretties are so pretty this year.
 I wish I had more of them.
 These lilies are my favorites and bloom so beautiful every year.
 And I love their orange color.
I hope you enjoyed a quick tour of my summer flowers. I will have more flowers start to bloom in a week or two. I can't wait to see their pretty blooms.
See ya later!

Teresa


Sunday, June 23, 2013

Friend, Celebrate Today!

Hello! 
It's the end of the weekend a brand new week is just ahead and I have a new card to share today. For this card I used this sketch from Seize The Birthday
This is my first time over at Seize the Birthday so if it's new to you too go over and check it out.
Now here is my card:

 After I finished the background I made the tag. I have a ton of these foam hearts in pinks, red and white. I grabbed the smallest white heart that was glittered and inked the edges with Fired Brick distress ink and  also the edges of the tag. I added the red gemstone to the heart and there was a small red banner scrap laying on my desk that I incorporated into the card by inking the edges with Black Soot distress ink and stamping "friend " in Tuxedo Black Memento Ink. I also stamped the sentiment, Celebrate Today in black onto the label and tied on the ribbon to finish the tag. I adhered the tag to the card with pop up dots.
 Here is a close up of the heart. It has a nice sparkle to it.
 
Just before I took these photos I decided to add three clear gemstones to the flowers on the pattern paper but changed them out for pearls which I think looks better.
 Here you can see the dimension of the tag and pearls.
I think I will also enter this in the tag challenge over at A Blog Named Hero where you need to use a tag on your card or project.
Thanks for the visit and I hope you come back soon!

Teresa